
How to Use Jarvis, Microsoft's One AI Bot to Rule Them All
With all the talk about chatbots such as ChatGPT, it’s easy to forget that text-based chat is just one of many AI functions. The ideal generative AI would be able to work across different models as needed, interpreting and generating images, audio and video.
Enter Jarvis, a new project from Microsoft that promises one bot to rule them all. Jarvis uses ChatGPT as the controller for a system where it can employ a variety of other models as needed to respond to your prompt. In a paper (opens in new tab) published by Cornell University, Microsoft researchers (Yongliang Shen, Kaitao Song, Xu Tan, Dongsheng Li, Weiming Lu and Yueting Zhuang) explain how this framework works. A user makes a request to the bot, it plans the task, chooses which models it needs, has those models perform the task and then generates and issues a response.
The chart below, provided in the research paper, shows how this process works in the real world. A user asks the bot to create an image where a girl is reading a book and she is positioned the same way that a boy is in a sample image. The bot plans the task, uses a model to interpret the boy’s pose in the original image and then deploys another model to draw the output.

Microsoft has a Github page (opens in new tab) where you can download and try out Jarvis on a Linux-powered PC. The company recommends you use Ubuntu (the outdated version 16 LTS specifically), but I was able to get the main feature of it — a terminal based chatbot — working on Ubuntu 22.04 LTS and on Windows Subsystem for Linux.
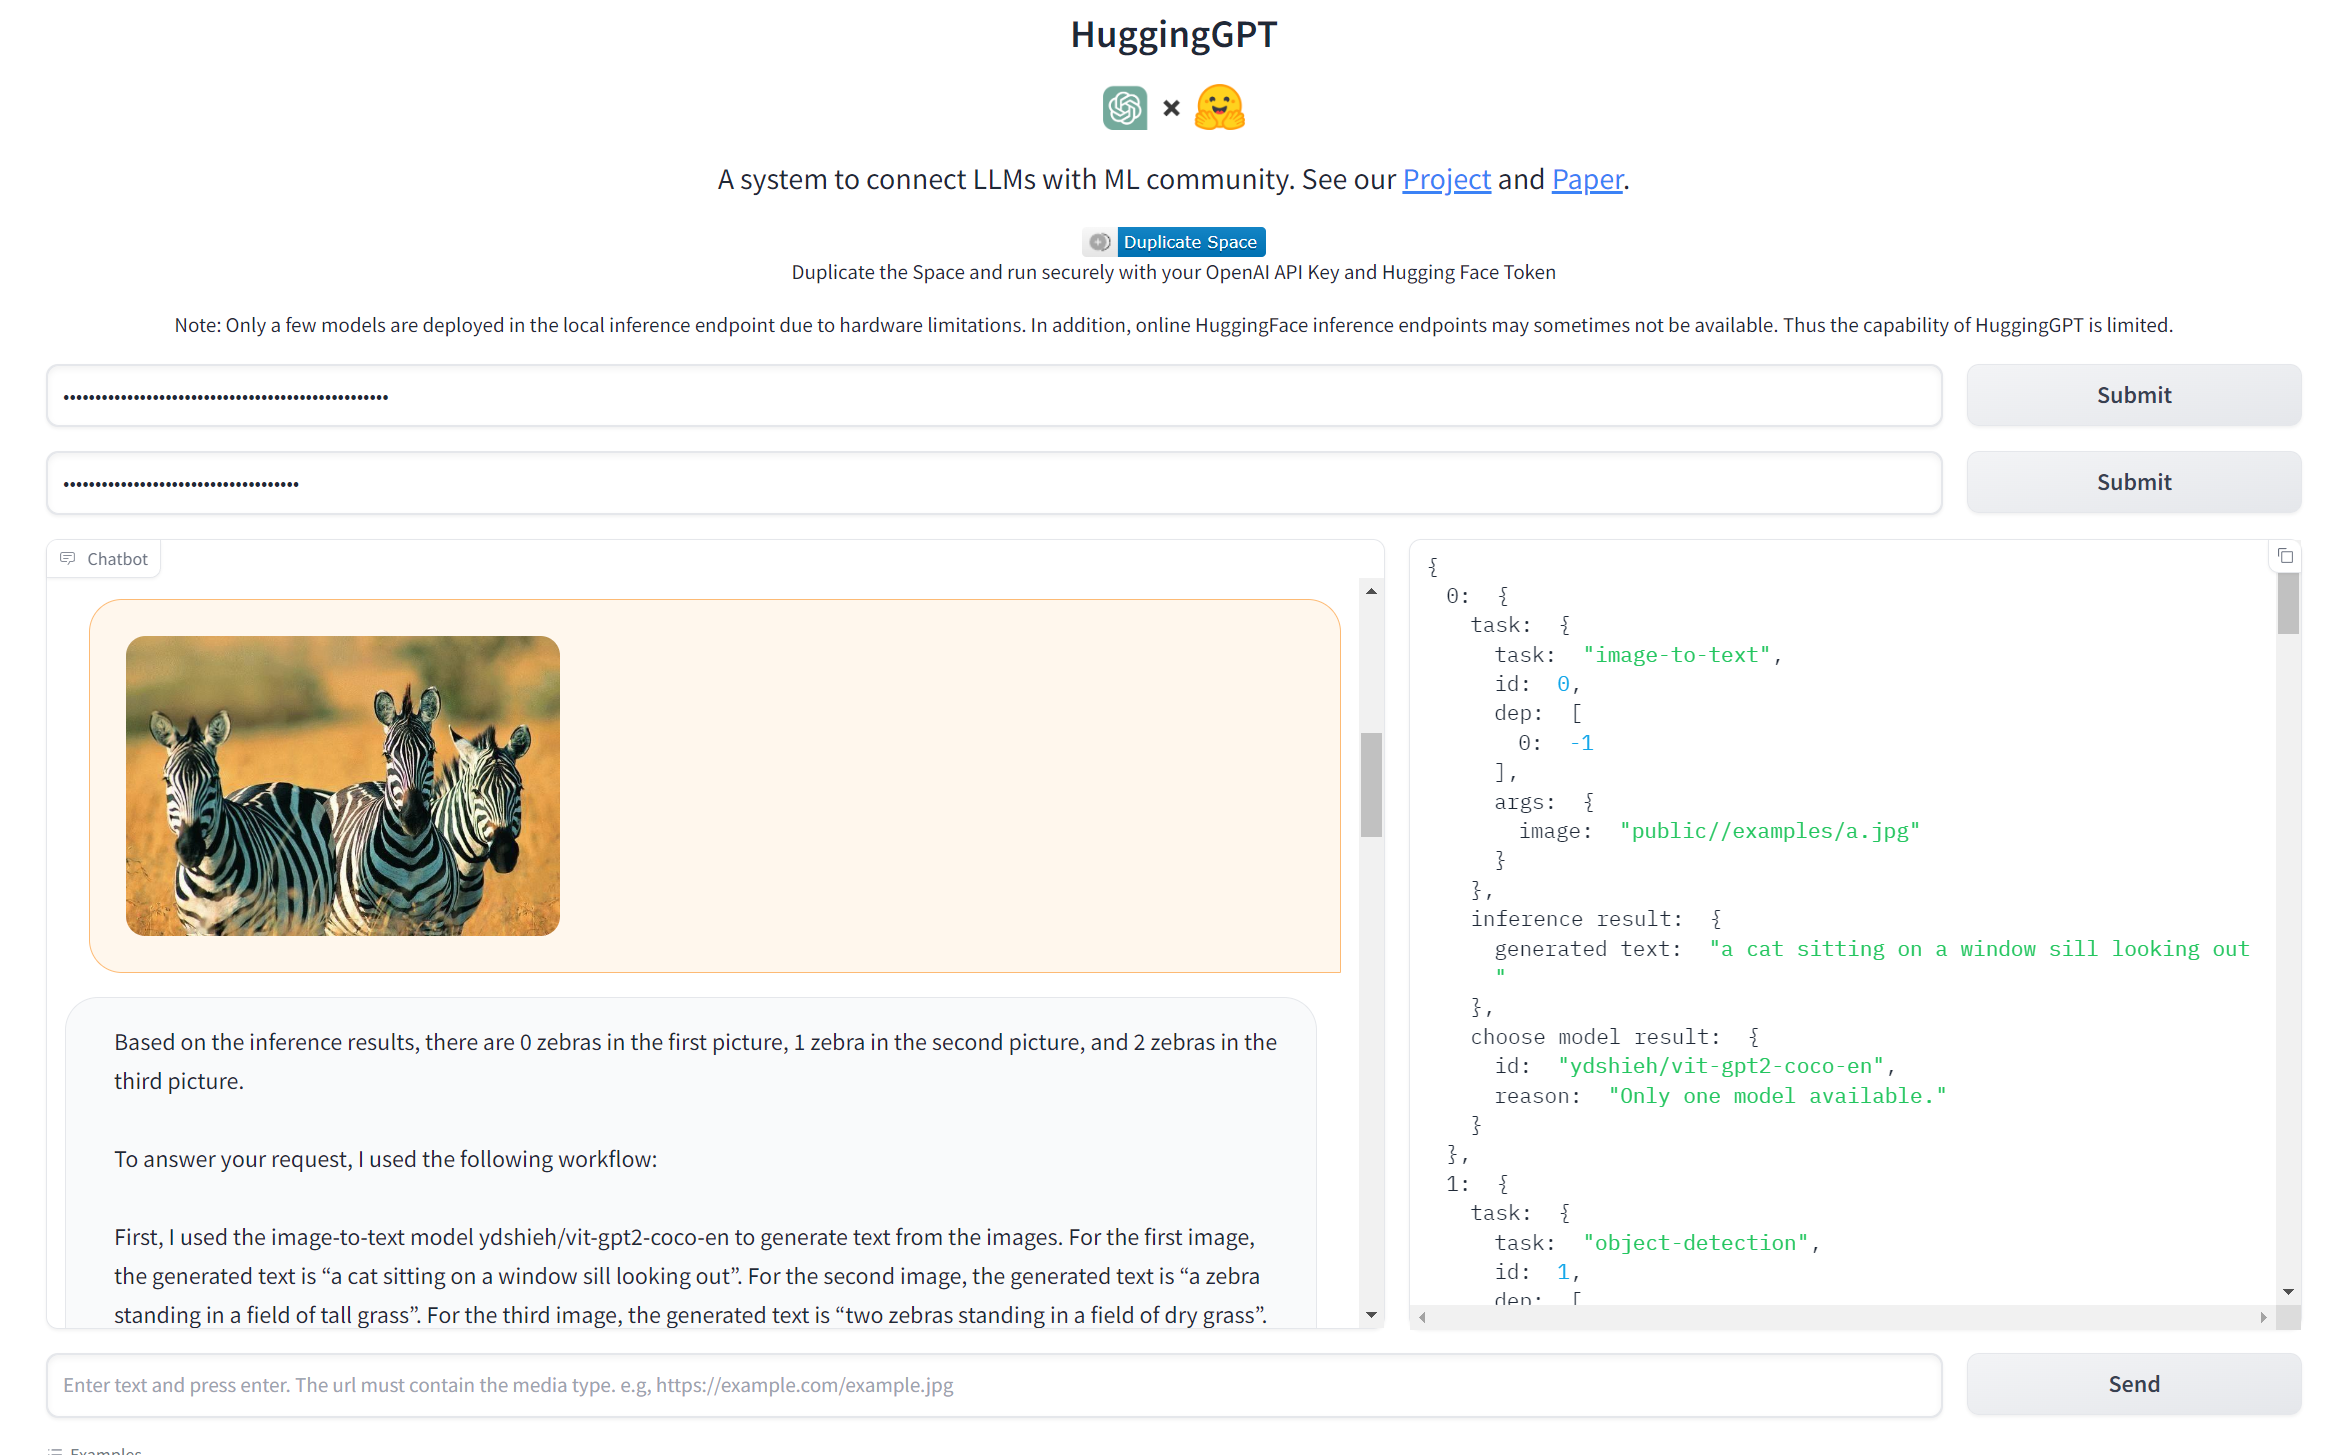
However, unless you really like the idea of messing with configuration files, the best way to check out Jarvis is by using HuggingGPT (opens in new tab), a web-based chatbot that the Microsoft researches have set up at Hugging Face, an online AI community which hosts thousands of open-source models.
If you follow the steps below, you’ll have a working chatbot you can show images or other media to and ask it to output images as well. I should note that, like other bots I’ve tried, the results were very mixed.
How to Set Up and Try Microsoft Jarvis / HuggingGPT
1. Obtain an OpenAPI API Key if you don’t already have one. You can get it at OpenAPI’s website (opens in new tab) by signing in and clicking “Create new secret key.” Signing up is free and you will get a free amount of credit, but you will have to pay for more if you use it up. Store the key somewhere like in a text file, where you can easily get to it. Once you copy it, you can never get it again.

2. Sign up for a free account at Hugging Face if you don’t already have one and log in to the site. The site is located at huggingface.co (opens in new tab) not huggingface.com.
3. Navigate to Settings -> Access Tokens by clicking the links in the left rail.
4. Click New Token.
5. Name the token (anything at all), select “write” as role and click Generate.
6. Copy the API key and keep it somewhere you can easily access it.
7. Navigate to the HuggingGPT page (opens in new tab)
8. Paste your OpenAPI key and Hugging Face token into the appropriate fields. Then hit the submit button next to each.
9. Enter your prompt into the query box and click Send.
How to Setup Jarvis / Hugging GPT in Linux
It’s much easier to use HuggingGPT on the Hugging Face website. However, if you want to try installing it on your local Ubuntu PC, here’s how. You may also be able to modify it to use more models.
1. Install git if you don’t have it already.
sudo apt install git2. Clone the Jarvis repository from your home directory.
git clone https://github.com/microsoft/JARVIS3. Navigate to the Jarvis/server/configs folder.
cd JARVIS/server/configs4. Edit the configuration files and enter your OpenAI API key and Hugging Face tokens where appropriate. They are config.azure.yaml, config.default.yaml, config.gradio.yaml and config.lite.yaml. In this how-to, we’ll only be using the gradio file, you it makes sense to edit them all. You can edit them using nano (ex: nano config.gradio.yaml). If you don’t have these API keys you can get them for free from OpenAI (opens in new tab)and Hugging Face (opens in new tab).

5. Install Miniconda if you don’t have it installed already. You’ll need to download the latest version from the Miniconda site (opens in new tab). After downloading the installer, you install it by going to the Downloads folder and entering bash followed by the install script name.
bash Miniconda3-latest-Linux-x86_64.shYou’ll be prompted to agree to a license agreement and confirm the install location. After you have installed Miniconda, close and reopen all terminal windows so that the command conda will now be in your file path. If it is not in your path, try rebooting.
6. Navigate back to the JARVIS/server directory.
7. Create and activate a jarvis conda environment.
conda create -n jarvis python=3.8 conda activate jarvis8. Install some dependencies and models.
conda install pytorch torchvision torchaudio pytorch-cuda=11.7 -c pytorch -c nvidia pip install -r requirements.txt cd models bash download.sh # required when `inference_mode` is `local` or `hybrid`. 9. Return to the JARVIS/servers folder.
10. Run the command to launch the HuggingGPT local webserver using gradio.
python run_gradio_demo.py --config configs/config.gradio.yamlYou will then be given a local URL you can visit in your web browser. In my case, it was http://127.0.0.1:7860.
11. Visit the URL (ex: http://127.0.0.1:7860) in your browser. If you are using Ubuntu in a VM, use the browser within the VM.
12. Enter your OpenAPI API key into the box at the top of the web page.
13. Enter your prompt(s) in the prompt box and hit Enter.
Using the gradio server is just one possible way to interact with Jarvis under Linux. The Jarvis Github page (opens in new tab) has more choices. These include using the models server or starting a command-line based chat.
I couldn’t get most of these methods working (the command line chat worked ok but wasn’t as nice an interface as the web one). Also, you may be able to install more models and get text-to-video generation going (which I could not).
What to Try with Jarvis / Hugging GPT
The bot can answer standard text questions, along with queries asking about images, audio and video. It can also potentially generate images, sound or video for you. I say potentially because, if you use the web version, it’s limited by whatever free models it can access from Hugging Face. On the Linux version, you may be able to add some additional models.
There are some sample queries listed below the prompt box that you can click and try. These include feeding it three example images and having it count how many zebras are in them, asking it to tell a joke and show a cat picture or asking it to generate one image that looks like another one.
Since it’s web-based, the way to feed it images is to send it the URLs of pictures that are online. However, if you are able to use the Linux version, you can store images locally in the JARVIS/server/public folder and refer to them by relative URLs (ex: /myimage.jpg would be in the public folder and /examples/myimage.jpg would be in the examples subfolder of public).
Most original queries I tried did not turn out particularly well. Image recognition was particularly poor. When I fed it images of M.2 SSDs and asked where I could buy one, it said that it had identified the SSDs as either a suitcase and then told me to find “a store.”
Similarly when I fed it a screenshot from Minecraft and asked it where I could buy it, it falsely claimed that it saw a kite flying through the air. It thought an RTX 4070 was a black and white photo of a computer. And when I asked where I could buy one, it said “you can purchase one of these items from our online store or from a variety of retailers near you.” but there was no actual link to any real online store.

It wasn’t very good at generating images on demand. For example, I asked it draw Abraham Lincoln driving a convertible and it just gave me a straightforward bust of the former president.
In short, apart from the specific examples Microsoft suggests, most queries did not turn out particularly well. But as with other AI frameworks such as Auto-GPT and BabyAGI, the problem is in the models you use and, as the models improve, so will your output. If you want to try autonomous agents, check out our tutorials on how to use Auto-GPT and how to use BabyAGI.